

Read more function
If you feel your views on the blog post too long so that makes full view on the main page of your blog, then you can shortly so as not to meet the home page blog and also to tidy up and beautify the appearance of your blog.
By installing scripts read more or learn more, with automatic appearance can make a long your posting be seen a half on the main page of your blog. And will appear tulisn read more ... under your posting which when clicked will open a full whole your posting.
Now follow these steps to make it :
1.Go to Layout menu and then select Edit HTML
2.Checked cekbox the "expand widget templates"
3.Click Ctrl F to open search box
4.Copy n Paste following code into the search box
5.If you have found, then replace that code with the following code:
How to backup your "Widgets"
Be like my promise at my previous post that is i will posting how to backup the data in the widget / page element.
If emerging question do we require to back up the data in page element? the answer is very require to. Because if you change your old template with new template, hence the data in page element will follow to be vanished, and you'd lose all data be like : guest book, blog accessory, blog tool, and also all which have been attached in your blog forever.
Many the way to back up the data in Widgets / page element, but i'm limitation of time to comment it in detail, hence I will try explain just two way, that is backing up directly from Page element and also backup from template source code.
• Back up widgets From Page Element
Back up widgets in this way be in fact very disturbing, however than we lose various accessory and also tool which have been attached, wiser likely to do so.
Please follow the steps below :
1. Login to blogger with your ID
2. Click Layout.
3. Click menu Page Elemet, you will see the page be like this ( just example):
4. At representative of above seen the article edit which I give red circle, You must click at Edit in each the page element, hence will emerge popup window figuring in the code have in input to that. Pay attention the picture below :
5. Copy the code inside there, and paste to Notepad.
6. Repeat the step above at all the elements.
7. Finish.
There is the step how to back the data inside page element. This is the other way to backup your widgets.
• Back up widget through Template Source Code
I think this way is more quickly and efisian, you need a few time to do this. This is the steps :
1. Visit your blog address.
2. After you at your self blog, click the menu View at the bar menu. See the picture below :
3. After click the menu View, will be out the sub menu, then click Source.
4. if your browser is Internet Explorer, so there is automatically will out the notepad with your template source code. If your browser is Mozilla Firefox or Opera, so there is out the new page with your template source code For example, see the picture below :
5. Save your template source code.
6. Finish.
If your question, where is the widgets code? there is always begin with :
For example, in my template source code. there are code be like this :
So, my widget code is like this :
I hope with this post you become know how to backup your widget template. So, if you want change your template with a new template. Please don't forget to backup your template and your widgets too.
See you in my next post.
How to change the template
At this opportunity, I will discuss about how to change template in blogger.com. First matter to be in considering in changing template is you have to make a backing up your old template, this good for if you feeling not match with your newly template. if you not yet known the way to back up template, please read at the post how to backup template, and also don't forget to back up your widgets (this is very important). For back up your widgets, please read at the post how to backup your widgets.
To change the template, of course you must had a new template to uploaded. If still not yet had, you can download for free template at Bloger templates or at other sites. Have ready for changing your old template with newly template? Please follow the steps below :
1. Login to blogger with your ID
2. After entering the dasboard page , click Layout.
3. Then click edit HTML tab
4. Click the Download full template link. Save your template:
5. Click browse... button. Choose your new template. and then click Upload button.
browse button image
6. Usually go out commemoration that your data in your widgets will be delete forever (so don't forget to backup your widgets).
For example, the image will show like this :
7. Click at Convirm & Save button.
8. Finish. Please look he result.
Now you have had the new face. However of course your template is still empty, So next step is inserting your widgets manually through page element menu.
Enjoy your new blog face.
Tutorial in creating blog in Blogspot
1. What is Blog?
Blog is short for "Web log", which is a a web application containing note or writing that are usually called "post" and displaying on the web pages. The posts are often displayed orderly based on the age or based on the time when the writing is written and published, so when you view a blog, you will first find the latest posts, top to bottom of the web page and the first to the last page, if the blog has had more than one web page.
For the first time, blog was created as the online private notes, but along with its development and popularity, blog has various types of contents or writings such as tutorial (e.g. this blog), sharing, business, etc. In general, blogs seem not to have the difference with the sites on the Internet.
The blog platform or used to be called blog machine has been created in such a way by blog designers or developers in order to be user friendly, so the knowledge of HTML, PHP, CSS, etc that was a must to create a web application, now with blog, everything is so easy as 1, 2, 3.
2. How to create blog in blogspot
One of the free blog providers that is quite popular today is blogspot or blogger, where you have to register through blogger.com and you get the domain name as sub domain of blogspot, e.g. yourname.blogspot.com.
Why should you create blog in blogger.com, not in other free blog providers? Actually, there is no “should”, but blogger.com has more advantages than other providers do. One of the advantages is the easiness in operating so that blogger.com is good for the beginners. Other advantages are the freedom in editing and replacing the templates to make the best display, custom domain which means that you can replace the domain with your own but with the blogspot hosting, e.g. yourname.blogspot.com can be changed into yourname.com, but still in the same hosting, i.e. the free blogspot hosting.
It should be emphasized from the beginning that the Internet is highly dynamic, so it is very possible that this practical guide to create blog in blogspot will not be relevant anymore as changes occurring, whether to the platform, coding, or anything else that you see right now in blogger.com
To reduce something unneeded to write, below is how to create blog in blogger.com.
Creating Email
One of the conditions required in creating blog is to have an active email address. If you do not have an email, please register at gmail. Since Blogger is one of Google services, when you want to register at Blogger, you had better use Google Email or gmail. If you need a simple guide to create an email, please use Google search engine to search for the best guide.
Sign up for a blog at blogger
1. Please visit http://www.blogger.com
2. After registration page open, go to the right bottom of the page where you can change the language to your own to make you easier to understand the instructions, but in this tutorial, I use English for more global targeting. Please login by using your username and password of your gmail (your email account is allowed to use for login to blogger).
3. Click "CREATE A BLOG" button
4. Enter your Blog Title in the field next to "Blog Title", and your expected blog address in the field next to “Blog address (URL). Need to remember that when you enter your expected blog address, you have to be sure of it as you cannot replace it in the future, except you use Custom Domain facility. Check for the availability. If your expected blog address is not available, replace with your new one and so on until you get it. Then type the character you see next to "Word verification", below blog address point and click CONTINUE for the next steps.
5. Choose a starter template, meaning that you can replace this template in the future and then click CONTINUE.
6. You will see "Your Blog has been created!" meaning that now you have a blog and you are ready to start Blogging, by clicking "START BLOGGING".
7. You will soon be in the post editor, where you can write anything as you may have thought about before. (it is recommended to directly write for your first post to avoid "Blogger Anti-Spam Robot" that can result in your blog locked. For instance, you can write a very short entry if you have not prepared an entry: "Hello World!", and anything else you want. Click "PREVIEW" button to view how your post will be displayed, then click "PUBLISH POST" if you want your entry to be published.
8. Click "View Post" to see your blog. Below is the example of the blog display created
9. Done
IP Address Tracer
For my friend who likes to be accessory blogs, there's more as an accessory toolsekaligus blog nih blog. This tool serves to track the IP address (Internet Protocol), the visitors of our blog. In addition to the IP address, this tool also can track your browser and operating system used by visitors.
To obtain this tool, my friend can get it at many sites on the Internet. To avoid confusion searching, I take the example of one of them is http://www.ipnow.org. One example of which is owned view this site are as follows:
Interested in installing this? Please follow the steps below:
1. Please open the site http://www.ipnow.org
2. Under the heading Custom Image is a view that can be selected. Take for example: click the Custom Graphical Image Info
3. Choose a backround color and text color desired by pal
4. Click the Create My Image
5. Wait a while until the process is complete
6. Copy the code under the heading Linked Image, paste in notepad for later in the input to the blog
7. Please close the site
For how to enter the code in the copy before, please follow the instructions!
For classic template:
1. Sign in blogger
2. Click the Template menu
3. Click the Edit HTML
4. Copy the entire code of your template, then paste in notepad, please save used for data backup
5. Copy the code in notepad and paste in place of a buddy want
6. Click the Preview button to see changes
7. If it is OK, click Save Template Changes
8. Done.
For a new template:
1. Sign in blogger
2. Click the Layout menu
3. Click the Element menu page
4. Click on Add a Page Element
5. Click ADD TO BLOG in HTML / javascript
6. Copy the code in notepad, then paste in the fields
7. Click SAVE CHANGES
8. Move the new elements that made the place a buddy want, and click the Save button
9. Done.
Artisteer, The Automated Web Designer
Artisteer is the first and only Web design automation product that instantly creates fantastic looking, unique website templates and blog themes.wordpress themes Design awesome blogs and cool web templates in minutes wordpress themes Export to Blogger, Joomla, WordPress and other CMS products wordpress themes No need to learn Photoshop, CSS, HTML or other technologies wordpress themes Fun and easy to use!
With Artisteer YOU immediately become a Web design expert, editing and slicing graphics, coding XHTML and CSS, and creating Web Design Templates, Joomla templates, Drupal themes,WordPress themes, DotNetNuke skins, and Blogger templates all in minutes, without Photoshop or Dreamweaver, and no technical skills.
That's the message from the web sponsor Artisteer. Interesting indeed, and really interesting .... The bottom line for the webdesigner who wants to make his own template, can rely on this software. This software is able to produce an interesting template design not only joomla, but also Drupal themes, WordPress themes, DotNetNuke skins, and Blogger templates in a matter of minutes depending on the modifications that we want. But the program is paid so that if we export the results will show a disturbing watermark visual result. So, how do I let her watermark does not appear? The logic is yes must buy .. ... But do not worry Boz, ... I've included "keymaker" so that it can be used forever home does not upgraded to a higher version. This blog software is the full version 2.3. Please download the software and its on the menu keymaker download this blog.
Mikrotik as Bridge
Mikrotik as Bridge is intended that the interface that leads to the Internet functioned as a Bridge (Bridge) for internet connection. With the Bridge is the traffict BW from Interface (ether1 or have your name change) will miss the Bridge. Based on the author's experience, by setting this Bridge to be more stable internet connection .. Here's how its settings ..
Open Winbox, Click Menu Bridge, click the + sign, apply, OK
Click the Port menu, Double Clik ether1, arrow down, select Bridge 1, Apply and OK
Results and Traffict BW Bridge configuration that is being used ...
keep try...
How can I make my blog load faster?
The speed at which your blog loads is critical to attracting more readers to your blog. If your blog takes a long time to load, many readers may leave your blog before they have the chance to read it. Here are a few tips and tricks that will help your blog load faster and attract more users:
Posts
Your blog's load time can be affected by the number of posts you display on your main page. You can easily edit the number of posts displayed of the main page from the Settings | Formatting tab. You can then select the number of posts you want to display on the main page. We recommend displaying 10 or fewer posts on the main page.
Third Party JavaScript and Links
For optimal blog load speed, we recommend using Google/Blogger widgets, JavaScipt and links. However, if you need to use third party JavaScipt and links, your blog will load much faster if you put all JavaScript at the bottom of your blog. If you have third party JavaScript and links in your sidebar, put them in at the bottom of the sidebar.
Images and Media
Learn even more ways Google products work together.
The more images, videos and other multi-media you have on your blog the longer it will take to load. However, images and other multimedia are important to attracting users to your blog, so it is important to optimize the load speed of your images and media. Here are a few tips to increase the load speed of your media:
• Decrease the size of your images or use thumbnails that link to the full-size image.
• If you use third party images, consider uploading them to Picasa Web Albums via the Blogger post editor.
• If you have a large number of images to display, you can upload all your images (from a vacation or event) to a Picasa Web Album and link to the album in your post or sidebar.
Other suggestions
• If you've added any custom CSS to your blog, make sure you put it at the top of the page.
• The most important content of your blog that catches readers attention should load the quickest. To help you identify which items are taking the longest to load you can use Stopwatch. To use Stopwatch, enter your blog's URL into the text box and click "Start StopWatch". Stopwatch will then open your blog in a frame and will record the time it takes for everything on your blog to load, including images, videos, widgets, etc. Take note of the items that take the longest to load and modify them appropriately using our suggestions.
Adding Live Traffic Tracking Tool to Blog
Want to know where are your visitor come from for live? If yes, you can add blog tool from http://feedjit.com. With web or blog tool from http://feedjit.com, you can know your visitor come from. Easy install to blog and without signup before, grab the code and add to your sidebar and you have a live tracking tool for free.
Below is the example widget from feedjit.com :

This is the steps to add widget Live Traffic Feed to your blog :
1. Login to blogger with your ID.
2. At the dashboard, click Layout.
3. Click Page Element tab.
4. Click Add a Page Element.
5. Click ADD TO BLOG for HTML/Javascript.
6. Copy and then paste the following code :
7. Click SAVE CHANGES button.
8. Done. Now you have a tool for tracking your visitor come from.
Now you have a tool to track your visitor.
Read More......
Add Yahoo Mesenger to Blog
This is the style ID of yahoo! messenger icon :

For example. If your yahoo ID is bapabadut@yahoo.com, your ID is bapabadut, So the code for yahoo! messenger icon with choice Style ID 9 is as follows :
Now, how to place the code to your blog. Follow the teps :
- Login to blogger with your ID.
- After entering the dasboard page , click Layout. Please saw the picture :
- Click at Page Element tab. See the picture below :
- Click at Add a Page element.
- After emerging pop up window , click add to blog button for the things HTML/JavaScript. See the picture following :
- Copy and paste the code below into available column :
-
-
-
Pengenalan Joomla!!
1. Pengenalan Joomla!!

“Joomla! is one of the most powerful Open Source Content Management Systems on the planet. It is used all over the world for everything from simple web sites to complex corporate applications. Joomla! is easy to install, simple to manage, and reliable.” –www.joomla.org
a. Content Management System
Sebagai langkah awal ada baiknya Anda mengerti dahulu apa itu CMS atau Content Management System. Apakah sama dengan software HTML editor lainnya seperti Microsoft FrontPage, Dreamweaver, atau bahkan sebuah Notepad? Seperti yang kita ketahui, content merupakan salah satu urat nadi dari kehidupan sebuah website. Tanpa content dapat dipastikan tidak ada website. Sebuah website yang dikelola dengan baik pasti akan selalu berusaha menampilkan content terbaru bagi para pengunjungnya. Lalu apa yang dim aksud dengan content sebenarnya? Pada dasarnya content adalah sebuah unit informasi yang digunakan untuk membentuk sebuah halaman di website. Dapat terdiri dari apa saja; teks, gambar, video, suara, dan lain sebagainya.
Dari content yang sudah ada tadi, kemudian diatur sedemikian rupa sehingga membentuk sebuah website. Untuk memudahkan pekerjaan, sering kali aturan-aturan dan proses kerja pun dibuat antara seorang webmaster yang lebih memperhatikan sisi teknis dan penampilan dari website dengan seorang penulis/editor yang menyumbangkan content untuk website. Dalam arti kata lain, manajemen terhadap content yang akan ditampilkan. Baik webmaster maupun penulis/editor dapat membuat, mengedit, mengatur dan mempublikasikan sebuah content dalam framework/sistem yang telah dipersiapkan sebelumnya.
Framework atau sistem, tempat di mana content itu diletakkan menfasilitasi ‘perkakas-perkakas’ yang dibutuhkan untuk menjaga konsistensi proses pembuatan halaman-halaman di
website secara e fisien dan efektif. Bila semua informasi diatas kita gabung menjadi satu, dapatlah disimpulkan, CMS adalah sebuah sistem yang memudahkan proses penciptaan sebuah website dinamis yang kaya akan content, dengan memberikan kemudahan kepada penulis/editor untuk me nambah, memperbaharui dan menghapus content yang ada tanpa campur tangan langsung dari webmaster. Sebuah CMS akan membedakan content dari desain, memelihara konsistensi tampilan dan memudahkan pemanfaatan content untuk berbagai keperluan. Dengan menyimpan data di satu tempat, mengontrol hak akses dan alur kerja memperbesar kesempatan pemakai berpartisipasi dalam pengembangan website anda.b. CMS Joomla [www.joomla.org]
Joomla adalah salah satu dari ratusan free CMS yang tersedia di Internet yang memiliki jumlah pengguna yang besar. Kemudahan pengaturan content, dukungan di Internet yang banyak, plugin yang melimpah; merupakan keunggulan CMS Joomla yang membuat Joomla banyak diminati orang.
Pada Joomla, setiap halaman dari web memuat bermacam-macam block dari content, block ini disebut juga position. Anda mengatur layout untuk halaman dengan sebuah template, termasuk penempatan banyak block pada halaman web, font, warna, dan background. Lalu Anda menempatkan bermacam-macam module dalam sebuah block. Dan tera khir Anda menambahkan content dan menampilkan pada halama n utama web Anda.
a. Aplikasi yang Anda butuhkan :
- Paket AMP (Apache, MySQL, dan PHP) : salah satunya adalah XAMPP yang sudah terintegrasi AMP didalamnya dan menghemat resource komputer dibandingkan menginstall AMP satu-persatu.
- CMS Joomla versi 1.5.3
- Notepad++, freeware untuk mengedit bahasa pemrograman. Alternatif : Wordpad,
- Editplus, Macromedia Dreamweaver atau PHP editor lainnya.
- 7zip, freeware program kompresi yang powerful. Alternatif : WinZip atau WinRar
- Internet browser, contoh: Internet Explorer atau Opera atau Firefox.
b. Instalasi paket AMP (XAMPP)
Instalasi paket AMP pada komputer Anda (sebelum Anda menguploadnya ke Internet) diperlukan untuk menjalankan CMS Joomla.
Pastikan MySQL dan Apache sudah aktif (Running)
Untuk mengetesnya akses pada internet browser ketik localhost.
Selanjutnya file dan folder web Anda aka n ditempatkan di : C:\Program
Files\xampp\htdocs
3. Instalasi CMS Joomla
a. Ekstrak paket Joomla [Joomla_1.0.10.zip] ke folder C:\Program Files\xampp\htdocs
b. Rename folder hasil ekstrasi dengan nama yang Anda inginkan. Misalkan webmakanan
c. Jalankan internet browser Anda, akses : localhost/webmakanan. Jadi instalasi CMS Joomla
dilakukan via internet browser.
d. Pre-installation check : pastikan setiap item ditandai warna hijau. Lalu klin Next.
e. License : Klik Next
f. Database
Langkah 1 : Isi konfigurasi database se suai dengan yang Anda gunakan.
g. FTP Configuration : klik Next
h. Configuration
Langkah 2 : Isi nama web Anda pada field Si te name Misalkan Aneka Makanan.
Langkah 3 : Isi field Your E-mail dengan email Anda dan field Admin Password dengan Password yang Anda inginkan.
Langkah 4 : Sebagai pemula, jangan lupa mengklik ”Install Sample Data” yang nantinya akan berubah menjadi ” Sample Data Installed Succesfully”
Kemudian kilk Next
i. Finish
Langkah 5 : Hilangkan folder [installation] pada folder web Anda
[C:\Program Files\xampp\htdocs \webmakanan\]
Langkah 6 : klik Admin untuk melihat halaman admin web. Atau dengan mengakses localhost/webmakanan/administrator
Langkah 7 : Klik Site untuk melihat halaman depan web baru Anda. Atau dengan mengakses localhost/webmakanan.
Pada CMS Joomla halaman web terbagi dua bagian yaitu halaman Backend dan Frontend. Halaman Backend adalah halaman admin yang digunakan untuk melakukan segala konfigurasi web Anda. Akses : localhost/webmakanan/administrator
Halaman Frontend adalah halaman yang akan tampil dan dapat dilihat oleh semua pengunjung web Anda. Akses : localhost/webmakanan
4. Manajemen Content Joomla
Setelah Anda menginstall CMS Joomla, Anda dapat memulai untuk be kerja dengan content. Versi Joomla saat ini mempunyai hirarki content yang statis : Anda harus membagi content ke dalam tiga hirarki, tidak lebih, tidak kurang. Tiga hirarki itu adalah : Sections, Categories, dan Content. Sections seperti kontainer yang besar yang berisi semua categories. Categorie s adalah container yang lebih kecil dan berisi content. Segala teks dan gambar yang tampil pada halaman web adalah content. Anda tak dapat membuat content tanpa memiliki sections dan categories.
Sebagai contoh, kita akan membuat sebuah web laboratorium. Hirarkinya sebagai berikut :
Section: Makanan
Section : Kue-kue
Category :
Category :
Makanan Traditional
Kue Kering
Makanan Modern
Kue Basah
Makanan Sehari-hari
Puding
Section : Minuman
Category :
Minuman Traditional
Minuman Modern
a. Untuk mengatur segala konfigurasi web, termasuk pengubahan hirarki content, masuk ke halaman administrator Joomla (localhost/workshop/administrator).
b. Masukkan username dan password.
Membuat Section Klik pada menu atau icon untuk menambah atau mengedit section Ini akan membawa Anda menuju layer section manager Klik lingk untuk mengedit section yang asal Klik icon New untuk membuat section baru
Secara default, joomla sudah menginstall beberapa section (begitu juga category dan content).
a. Klik salah satu link untuk mengedit link yang ada. Misalkan link About Joomla!
b. Masukkan pada field Title dan Alias : Makanan
c. Klik icon Save untuk menyimpan perubahan dan kembali ke halaman Section Manager.
NB : Icon Apply untuk menyimpan perubahan dan kembali ke halaman Section Editor.
Icon Close untuk membatalkan perubahan.
[ .:: Latihan ::. ] Buat 2 section lainnya dengan mengedit section yang sudah ada (News dan
FAQs), yaitu Minuman dan Kue-kue
Hasil Akhir :
NB : Untuk kembali ke halaman administrator awal, klik menu Site -> Control Panel.
Membuat Category
Klik pada menu atau icon untuk menambah atau mengedit category
Ini akan membawa Anda menuju layer Category Manager.
Klik untuk mengedit category yang ada Klik icon New untuk membuat category baru
a. Klik icon New untuk membuat category baru.
b. Masukkan pada field Title dan Alias : Makanan Traditional
c. Pilih Section : Makanan
d. Klik icon Save untuk menyimpan perubahan dan kembali ke halaman Section Manager.
NB : Icon Ap ply untuk menyimpan perubahan dan kembali ke halaman Section Editor.
Icon Close untuk membatalkan perubahan.
[ .:: Latihan ::. ] Buat 7 category lainnya dan sesuaikan dengan category yang seperti dalam contoh, dengan mengedit category yang sudah ada dan meng-unpublish category yang tidak diperlukan.
Hasil Akhir :
Membuat Content Item
Ada beberapa cara untuk membuat content :
Anda dapat menggunakan salah satu opsi-opsi untuk mengakses conten items
Kita akan menggunakan opsi menu Content -> Artikel Manager
Klik icon published agar content dapat terlihat oleh pengunjung web
Klik pada content title untuk mengedit content yang ada Klik icon frontpage untuk menampilkan di halaman depan web Kolom order dan tombol save untuk mengatur urutan-urutan content
Klik icon New untuk membuat content baru
a
b
c
d
e Text
f g h
a. Isi field Title
b. Jika content ingin di tampilkan di web, pilih option Yes, Jika content ingin ditampilkan di halaman depan web, pilih option Yes
c. Pilih Section
d. Pilih Category
e. Ketikkan atau masukkan artikel ke Text
f. Tombol Image digunakan untuk memasukkan gambar
Untuk mengambil gambar di komputer, b rowse files -> Start Upload -> Pilih gambar di deretan gambar -> klik Insert
g. Tombol Pag ebreak digunakan untuk melanjutkan teks ke halaman selanjutnya
h. Tombol Read more… digunakan untuk memotong artikel yang panjang.
[ .:: Latihan ::. ]
Isi content pada category : [Content bisa diambil di internet]
Makanan Traditional : Nasi Uduk
Minuman Traditional : Bajigur
Sate Ayam
Cendol Bandung
Opor Ayam
Minuman Modern : Banana Milkshake
Makanan Modern : Chicken Ste ak
Kue Kering : Nastar
Spaghetti
Kastengle
Makanan Sehari-hari : Sayur Asem Jakarta
Kue Basah : Putri Ayu
Tempe Bacem
Cucur
Puding : Puding Caramel
Puding Buah
Mengubah Tampilan Content pada Front Page
a. Akses Menu -> Main Menu
c. Ubah nilai pada field #Leading, #Intro,
#Columns dan #Links
d. Klik Icon Save
b. Pada Menu Item, klik Home
Hasil Akhir :
Welcome to the Frontpage
Opor Ayam
<< Isi Cari di Internet>>
Nastar
<< Isi Cari di Internet>>
Putri Ayu
<< Isi Cari di Internet>>
Puding Caramel
Sate Ayam
<< I si Cari di Internet>>
<< Isi Cari di Internet>>
More Articles...
Puding Buah
Banana Milkshake
« Start Prev 1 2 Next End»
Membuat Menu
Setelah membuat content yang terstruktur, maka dibutuhkan sebuah link agar end user dapat mengakses informasi yang diinginkan. Untuk mengakse s content, user membutuhkan sebuah menu yang berisi link-link untuk dapat mengakses content yang diinginkan.
CMS Joomla yang telah terinstall, secara default telah terinstall beberapa menu, yaitu Main Menu, Other
Menu, Top Menu, dan User Menu. Kita dapat membuat menu sendiri atau mengedit yang sudah ada.
Top Menu
Main
Menu
Resources
Key
Example
Concepts
Pages
User Menu
Untuk menambah atau mengurangi menu : Menu -> Menu Manager
Untuk menghilangkan menu, pilih menu lalu klik icon Delete Untuk menambah menu, klik icon New
[ .:: Latihan ::. ]
1. Delete menu Example Pag es dan menu Key Concepts
2. Buat menu : makanan (Makanan) dan kue (Kue)
3. Edit menu Resources menjadi minuman (Minuman)
Untuk menambah ata u mengurangi link pada menu : klik Menu Item di baris nama Menu
Klik disini Untuk menghilangkan link, pilih link lalu klik icon Trash, Untuk menambahkan link,
klik icon New
Articles – Article Layout : membuat link ke artikel yang kita pilih
Article Submission Layout : mengijinkan user untuk mengirimkan/membuat artikel. Ini
hanya berlaku bagi penulis dan anggota.
Category Blog Layout atau Category List Layout : membuat link ke category
Front Page Blog Layout : membuat link ke artikel yang berstatus front page yang
telah diatur tampilannya
Section Blog Layout atau Section Layout : membuat link ke section
[ .:: Latihan ::. ]
1. Pada menu mainmenu, Delete Menu Item 2, 3, 4, 5, 6, 7, 8 dan 9. Buat item Profil dengan opsi Articles – Article Layout. Sebelum membuat item tersebut, Buatlah artikel dengan judul Profil sebagai berikut :
Hasil akhir :
2. Pada menu usermenu, ubah nama item Submit an Article dengan nama Kirim Artikel, ubah nama item Your Details dengan nama My Details dan hapus item Submit a Web Link.
3. Pada menu topmenu buat menu item Story of This Web dan D3 Unggulan dengan opsi Articles – Article Layout. (Buat terlebih dahulu masing-ma sing artikel nya). Kemudian hapus item yang tidak diperlukan.
4. Pada menu minuman buat menu item Traditional dengan opsi Articles – Category Blog Layout menu item Modern dengan opsi Articles – Category List Layout. Kemudian hapus item yang tidak diperlukan.
5. Pada menu makanan buat menu item Traditional dan Modern dengan opsi Articles – Category Blog Layout menu item Lauk-Pauk dengan opsi Articles – Category List Layout. Kemudian hapus item yang tidak diperlukan.
6. Pada menu kue buat menu item Bas ah dan Kering dengan opsi Articles – Category Blog Layout menu item Puding dengan opsi Articles – Category List Layout. Kemudian hapus item yang tidak diperlukan.
Agar menu dapat tampil di halaman frontend web :
1. Akses menu Extentions -> Module Manager
Pada pembuatan menu manager sebelumnya, Menu Minuman diedit dari menu Resources, maka di module manager tidak terdapat m odule minuman. Oleh karena itu, ubah module Resources menjadi Minuman.
2. Atur urutan menu sehingga tampak seperti gambar di samping
Mengatur Tampilan Joomla Templates
Template dapat dianalogikan seperti “themes” pada OS Microsoft Windows, jadi yang bertanggung jawab pada tampilan web Anda. Pada template biasanya terdapat sebuah file index.php yang mende finisikan tampilan secara umum semua halaman web dan file css (cascading style sheet) yang mendefinisikan format dari halaman web.
1. Akses ke halaman Template Manager : Extensions -> Template Manager
2. Untuk mempreview template yang akan digunakan, arahkan mouse ke atas link template.
3. Untuk menggunakan template yang Anda inginkan, pilih templatenya lalu klik icon Default .
4. Untuk menggunakan template yang berbeda di halaman tertentu, klik template name,
kemudian di Menu Assigment pilih Select from List setelah itu pilih menu yang akan di bedakan template nya.
Modules
Merupakan plug-in yang tampak di front-end web. Digunakan sebagai jembatan antara Component dan Joomla. Anda membutuhkan Module untuk meng-a ktifkan componen yang di pilih. Contoh module seperti : fasilitas Login Form, Search, Pools dll.
1. Akses ke halaman Module Manager : Extensions -> Module Manager
2. Untuk menggunakan module yang Anda inginkan, aktifkan status enable.Components Plug-in yang berada di back-end web. Salah satu fungsinya, yaitu mengatur konfigurasi dari module. Misalknya membuat list pertanyaan pada module Pools.
1. Akses ke halaman Components : Components -> Pilih component yang dituju
2. Masing-masing component memiliki setting-an dan fungsi yang berbeda.
Plugins
Plugin disebut juga dengan istilah Mambots, yang terintegrasi dengan content, sehingga menambah fe ature dari content itu. Contoh yang paling jelas adalah editor untuk membuat suatu content, sehingga content dapat dibuat layaknya editor Microsoft Word dengan tampilan WYSIWYG. Nama Mambot itu adalah MCE Editor.
1. Akses ke halaman Components : Components -> Pilih component yang dituju
2. Untuk menggunakan module yang Anda inginkan, aktifkan status enable.
Language
Merupakan salah satu plugin yang digunakan untuk menambahkan bahasa di website kita.
1. Akses ke halaman Lang uage Manager : Extensions -> Language Manager
2. Untuk mengaktifkan, pilih bahasa yang akan diaktifkan, kemudian klik tombol Default yang ada di pojok kanan atas.
Cara Install/Uninstall Module, Plugin, Template, Language dan Component.
1. Akses ke halaman Install/Uninstall : Extentions -> Install/Uninstall
2. Browse file yang akan di install, kemudian klik upload file & install
3. Untuk meng-uninstall, masuk ke plugin yang dituju kemudian pilih yang akan di uninstall.
[ .:: Latihan ::. ]
1. Install dan gunakan template dengan nama Pizza.zip sebagai defaultnya.
2. Install dan gunakan template dengan nama Frooty Fresh.zip sebagai Assign untuk halaman
Minuman Modern
3. Install dan gunakan module mod_vvisit_counter.zip atur setting nya.
4. Install dan gunakan module camp26_smoothgallery_J15x.zip atur settingnya dengan width dan height 800. Kemudian masuk ke : modules/mod_camp26_smoothgallery/images_smoothgallery/
masukkan gambar(ukuran 500x70) yang akan ditampilkan dan ubah title menjadi Our Gallery
5. Install dan gunakan module mod_ulti_clocks.zip
6. Untuk plugin component pool s, buat pernyataan sebagai berikut :
7. Install dan gunakan com_easygb.zip. Buat menu dengan nama Buku Tamu di Top
Menu dan pilih item nya Easy GuestBook.
Read More......
pembuatan antena wajanbolic untuk Wireless Internet
(Sumber : Bagya Soetowo – bagya217@yahoo.com)
Bahan Utama :
1. Wajan dengan diameter minimal 40cm (harga sekitar Rp. 40.000,-)
2. USB Wireless LAN (harga sekitar Rp.200.000,-)
3. Pralon 3” panjang sekitar 23 cm.
4. Tutup Pralon 3” 2 buah (harga sekitar 2 x Rp. 4.000,-)
5. Aluminium Foil secukupnya.
6. Busa/Styrofoam bekas kemasan barang elektronik secukupnya.
7. Kabel USB (harga sekitar Rp.20.000,-)
8. Kabel UTP 12m (harga sekitar Rp.3.000,-/m)
Antena Wajanbolic terdiri dari 3 bagian utama :
1. Reflektor berbentuk Parabola menggunakan Wajan
2. Bagian Sensitif antena berbentuk Tabung berisi USB WLAN
3. Kabel penghubung antena ke komputer
Prinsip kerja antena Wajanbolic seperti antena parabola lainnya, yaitu menempatkan
bagian sensitif antena pada titik fokus parabola (wajan) sehingga semua gelombang
elektromagnet yang mengenai wajan akan terkumpul dan diterima oleh bagian sensitif
tersebut. Berikut ini kita bahas satu persatu.
1. Reflektor berbentuk Parabol menggunakan Wajan
Gunakan wajan dengan diameter minimal 40cm. Ukuran wajan lebih besar makin baik karena akan lebih banyak gelombang radio yang diterima. Hal terpenting pada bagian ini, adalah penentuan titik fokus wajan. Untuk itu gunakan rumus dibawah ini :
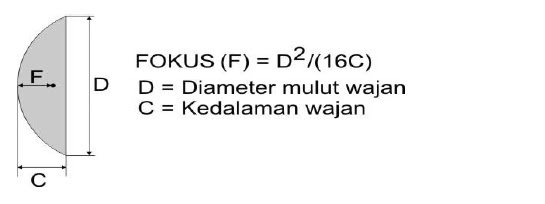

Catat posisi titik fokus tersebut. Nantinya mulut Tabung Sensitif antena harus berada
pada titik fokus tersebut.
Pasang Tutup Pralon 3” dengan mur/baut tepat ditengah wajan sebagai pemegang
Tabung bagian sensitif (lihat Gambar 1 A).
2. Tabung Sensitif Antena
Bentuk jadi Tabung sensitif dapat dilihat di Gambar 1B, berupa pipa pralon yang di
bagian dalamnya ditempatkan USB WLAN (Gambar 1C).
Sebagai Tabung dapat digunakan Pipa Pralon 3” sepanjang 23cm dan bungkus 16cm
dari panjangnya dengan Aluminium foil (Ingat ! Pipa Pralon 3” berdiameter 90cm),
Tutup salah satu ujung pipa yang terbungkus Aluminium dengan Tutup Pralon 3”.
Bagian dalam Tutup Pralon tersebut harus juga dilapisi Aluminium (Gambar 1D).
Buat lobang pada Pipa untuk menempatkan USB WLAN di dalam Pipa. Tentukan
Posisi USB WLAN 5cm dari Tutup Pralon. Jika digunakan Tabung ukuran lain, posisi
USB bisa ditentukan sebagai berikut :

Pasang USB LAN di dalam Tabung dan untuk memperkuat posisinya jepit dengan
Busa/Styrofoam (Gambar 1E).
Setelah Tabung Sensitif selesai pasang ke Wajan, bila perlu gunakan lem atau sekrup
(Lihat Gambar 1F)
Gambar 1 :

Desain lebih detail dapat dilihat pada Gambar 2.
Gambar 2 :


3. Kabel Penghubung Antena ke Komputer
Setelah Wajanbolic selesai dirangkai maka siap dipasang, misalnya diatas genteng
rumah (ketinggian sekitar 9m). Namun sebelumnya perlu kita siapkan Kabel
penghubung antara antena dengan konektor USB komputer. Untuk itu gunakan kabel
USB yang biasanya disediakan pada paket USB WLAN. Potong ditengah kabel USB
tersebut dan perpanjang dengan menggunakan kabel UTP (kabel LAN). Cara
menyambung Kabel USB dengan Kabel UTP adalah sebagai berikut :

OK, lengkap sudah perangkat Wajanbolic kita. Pasang Wajanbolic, arahkan ke
Menara antena Wireless Internet Provider (tentu sebelumnya anda harus mendaftar
sebagai pengguna Provider tersebut). Install software USB WLAN dan lakukan
koneksi dengan software tersebut. Jangkauan kerja antena ini sekitar 1-2km.
Selamat mencoba, semoga bermanfaat.
Salam buat Open Source Community!
Read More......
setup awal mikrotik
First of all to be able to configure Mikrotik RB 450, RB 750, etc. This, of course you need to login first ...
we begin to ya ...
Topology:
For LAN: class C
LAN : x.x.x.x/24.
Modem : y.y.y.y/24
root menu by typing "/"IP settings for each ethernet card
- Ip address add address = yyyy/24 interface = ether1
- Ip address add address = xxxx/24 interface = ether2
- Ip address print
Setting the IP routing
- Ip route add gateway = y.y.y.1
Setting DNS
- Ip dns set primary-dns = pppp allow-remote-requests = yes
- Ip dns set secondary-dns = nnnn allow-remote-requests = yes
Source NAT (Network Address Translation) / MasqueradingFor all existing computers on the LAN can connect to the internet as well.
- Ip firewall nat add chain = srcnat action = masquerade out-interface = ether1
DHCP (DynamicHost Configuration Protocol)
Creating an IP Address Pool
- Ip pool add name = dhcp-pool ranges = xxx2-xxx254
Add a DHCP Network
- Ip dhcp-server network add address = xx0.0/24 xx0.1 gateway = dns-server = pppp, nnnn
Adding a DHCP Server
- Ip dhcp-server add name = DHCP_LAN disabled = no interface = ether2 address-pool = dhcp-pool
Until here all computers should already be connected to the Internet. For that we need in the test with: ping to your gateway, pinging your dns and ping to yahoo.com.
Bandwidth ControlSpeedy Connection Speed 384/64 Kbps (Download / Upload)The number of client computers 10 pieces.
hopefully can help .. Read More......
squid penyimpan cahce bandwith
Jaringan internet anda lambat? mungkin squid proxy bisa membantu. Squid adalah proxy caching untuk Web yang mendukung HTTP, HTTPS, FTP dan banyak lagi. keuntungan yang berbeda nya adalah caching halaman yang sering diminta untuk mempercepat waktu buka halaman web dan juga mengurangi bandwidth dengan tidak harus kembali meminta halaman yang sama berulang-ulang. Hal ini juga dapat digunakan sebagai proxy reverse untuk mempercepat server Web dengan melayani Facebook konten di-cache daripada mengizinkan hits kontinyu ke server Web untuk konten yang identik untuk banyak klien.
Ada banyak vendor open sourcer yang menyediakan dilingkungan linux maupun freebsd.
Di linux ada ClarkConnect, Centos, ClearOs dst. sedang di freebsd ada PfSense, M0n0Wall.
Yang harus Anda lakukan adalah mengedit / etc / squid / squid.conf dan mencari "LAN" entri, untuk komentar dari orang-jaringan yang tidak pada jaringan lokal Anda. Misalnya, jika Anda menggunakan jaringan di rumah 192.168.0.x komentar dan 172.16.0.0 10.0.0.0 baris:
# Acl LAN src 10.0.0.0 / 8 # RFC1918 jaringan internal mungkin
# Acl LAN src 172.16.0.0/12 # RFC1918 jaringan internal mungkin
acl LAN src 192.168.0.0/16 # RFC1918 jaringan internal mungkin
Selanjutnya, memulai layanan Squid. Jika Anda memiliki firewall diaktifkan di sistem, pastikan untuk memungkinkan akses ke port TCP 3128.
Pada titik ini, Anda dapat menguji dengan menggunakan browser baris perintah pada sistem lokal dengan melakukan:
$ Http_proxy = "http://localhost:3128" elinks http://foo.com/
Dan kemudian melihat di / var / log / squid / file access.log. Jika browser tidak mengeluh tentang tidak bisa terhubung, dan file log menunjukkan aktivitas, maka Anda telah berhasil mensetup Squid. Log akan terlihat seperti ini:
1281203766.589 2626:: 1 TCP_MISS/200 18137 GET http://foo.com/ - DIRECT/1.1.1.1 text / html
1281203767.186 595:: 1 TCP_MISS/200 4867 GET http://foo.com/skins/common/ commonPrint.css? - DIRECT/1.1.1.1 text / css
Jika Anda jalankan perintah browser yang sama lagi, Anda akan melihat:
1281204000.528 313:: 1 TCP_MISS/200 18137 GET http://foo.com/ - DIRECT/1.1.1.1 text / html
1281204000.591 60:: 1 TCP_REFRESH_UNMODIFIED/200 4873 GET http://foo.com/skins/common/ commonPrint.css? - DIRECT/1.1.1.1 text / css
Ini menunjukkan Anda cache di tempat kerja. Halaman awal load lagi, tapi file CSS dikirim ke browser yang meminta menggunakan salinan cache. Langkah berikutnya adalah mencoba yang sama dari sistem lain yang juga akan menggunakan cache (Anda dapat dengan mudah menggunakan baris perintah perintah browser yang sama jika tersedia).
Jika Anda ingin memiliki setup proxy transparan, sehingga tak seorang pun akan tahu proxy sedang digunakan dan tidak bisa mengelak, Anda dengan mudah dapat melakukannya dengan menyesuaikan aturan iptables. Jika sistem firewall anda menjalankan Linux, hal ini mudah dilakukan. Catatan bahwa jika Anda menggunakan proxy transparan, Anda tidak dapat menggunakan otentikasi pada proxy. Jika hal ini tidak penting bagi Anda, pengaturan proxy transparan adalah cara yang cepat dan mudah untuk memaksa semua orang di jaringan untuk menggunakannya.
Di / etc / squid.conf squid / Anda ingin menghapus tanda komentar pada "cache_dir" direktif:
# Uncomment dan menyesuaikan berikut untuk menambah direktori cache disk.
cache_dir ufs / var / spool / squid 7000 16 256
dan perubahan
http_port 3128
untuk
http_port 3128 transparent
Setelah perubahan ini telah dibuat dan telah squid restart, Anda juga perlu mengubah aturan-aturan firewall untuk itu jaringan firewall Anda atau sistem gateway dengan mengalihkan semua lalu lintas HTTP output ke proxy. Hal ini bisa rumit, tergantung pada apakah atau tidak menginstal Squid Anda adalah pada sistem firewall atau jika sistem terpisah dalam jaringan lokal. Hal ini juga tergantung pada's firewall perangkat lunak Anda. The wiki squid memiliki bagian Interception (transparan proxy yaitu) dan bagaimana mengaturnya dengan perangkat Cisco, Linux, FreeBSD, dan OpenBSD.
Itu halaman wiki yang sama juga memiliki konfigurasi contoh lainnya. Squid dapat digunakan untuk lebih dari sekedar cache halaman Web, dan ada contoh ada tentang bagaimana menggunakannya untuk pesan Instan penyaringan, menggunakannya sebagai proxy reverse untuk permintaan halaman web cache pada server Web, bagaimana mengaturnya dengan berbagai bentuk otentikasi, dll
Squid sangat fleksibel dan dapat melakukan cukup banyak. Untuk organisasi besar, Squid menawarkan cara mengherankan mudah untuk menghemat bandwidth, serta memberikan cara mudah untuk memaksa otentikasi yang diperlukan dalam rangka untuk mendapatkan akses keluar untuk lalu lintas. Untuk caching Web sederhana, squid cukup banyak siap untuk dijalankan seperti apa adanya, dan wiki ini menawarkan banyak contoh dan membantu jika Anda perlu mempertimbangkan sesuatu yang sedikit lebih kompleks.
Vincent Danen bekerja pada Red Hat Security Response Team dan tinggal di Kanada. Dia telah menulis tentang dan mengembangkan pada Linux selama lebih dari 10 tahun.
Upload website to hosting
Kaspersky 2010
Hai sobat, hari ini saya mau sharing key untuk kaspersky antivirus edisi oktober 2010 untuk kaspersky 7,8,9 dan 10 (2011) yang bisa digunakan untuk antivirus dan interner security. Silahkan di download bro, mumpung gratis, hehehe...
Sekalian bagi sobat yang nggak tahu gimana cara masukin key-nya, dapat baca tutorial singkatnya di sini.
Tutorial Memasukkan Key Kaspersky
1. Sebelum mengaktivasi kaspersky menggunakan key file, pastikan koneksi internet sobat blogger dalam keadaan mati.
2. Klik License (terletak pada bagian bawah).
kaspersky
3. Klik Active New license
4. klik option Activate trial license. Maka akan muncul pesar error.
5. Klik Ok aja, lalu klik Browse
6. Cari key file yang sudah sobat blogger download dan ekstrak
7. Klik Next
8. Selesai dach...
Download Key Kaspersky Edisi Oktober 2010
Download (163KB)
Semoga berguna dan bermamfaat...
SmadAV 8.3 Pro + Key
Akhirnya yang ditunggu-tunggu hadir juga. Smadav 8.3 telah hadir dengan penambahan database 40 jenis virus baru dari total 4817 database virus yang dimiliki oleh antivirus lokal ini. Salah satu virus baru yang terdapat pada database Smadav adalah virus bernama "shortcut" yang membuat desktop kita dibanjiri oleh shortcut-shortcut yang diciptakan oleh virus ini. Oleh karena itu, segera instal dan scan kompi sobat dengan smadav terbaru versi 8.3
Jika smadav 8.3 di kompi sobat kena blacklist, sobat dapat menghilangkannya dengan cara memasukkan "anti-pembajakan" tanpa tanda kutip pada kolom nama di menu registrasi smadav pro dan tekan tombol "register".
Sobat bisa memakai key registrasi ini:
Nama: mampirbro
Key: 991399078042
Atau sobat bisa membuat sendiri key smadav dengan menggunakan nama sobat dengan memakai keygen smadav 8.2 walaupun keygen ini untuk smadav versi 8.2 namun keygen ini juga bisa di gunakan untuk smadav 8.3
Download Smadav 8.2 Free
Download Keygen Smadav
Download
Semoga berguna dan bermamfaat...


Link Exchange
The button image will displayed on your site like this


